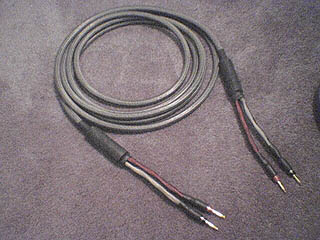
With just a few simple, basic tools, a couple inexpensive parts and an hour or two of spare time, you can create your own professional speaker cables. While center channel cables, bi-wire cables and long run surround cables are all easy to make, they are also extremely affordable. Here is a way you can make your own high-quality, traditional two-conductor cables.
Tools and Parts You Will Need
In order to create your own cables, you will need a small pair of scissors, a ruler, measuring tape, a small, flathead screwdrivers and a lighter, heat gun or hairdryer. The parts you will need will depend largely on what you are trying to accomplish, but for the purpose of this tutorial, make sure you have 10mm two-leg cable pants, ½-inch and ¼-inch 3:1 heatshrink, 3/8-inch tight-weave sleeving, 12-gauge two-conductor copper speaker cable and banana plugs or another type of end conductor.
Step 1: Choose sleeving, cable, heatshrink and cable pant size.
Depending on the resistance or ohms of your speakers, you will need to choose the appropriate length of the cable, sleeve and heatshrink. Research is first step in any do-it-yourself process; you will need to research the type of cable you have and its related parts.
Step 2: Measure the cable and cut
If you are unsure what your cable length should be, take a piece of string and run it from your speaker to your stereo in the same route that you plan to run the cable. Adjust the measurement by adding a foot or two to the overall length, note the measurement of the string and cut the cable to this length. Next, measure the length of just one of your cable pants, as well as the inside length of the cable inside your banana plug, and double this number.
Take the length of the cable minus the measurement from the banana plug and pants and cut your sleeving at this measurement. You may want to add an extra inch to make sure you have enough.
Step 3: Insert Sleeving
Once you have all of your measurements, it is time to slip on the sleeving. You should have no difficulty sliding it over the cable. Sometimes, you may have more success if you try four or five inches at a time, allowing the sleeving to bunch before pushing it further down. If your cable is particularly long, this will take some time. To make the process easier, you can try wrapping Scotch tape around the end of the cable to help it slide through without snagging.
Step 4: Apply Heatshrink
If you have noticed the ends starting to fray once you have the sleeving in place, don’t worry. Cut two half-inch long pieces off of the heatshrink and slide it over the sleeving. Again, if the sleeving is frayed or worn, use Scotch tape to hold down the frayed edges while wrapping the tape around the sleeving. This will allow you to slide the heatshrink over the tape. Don’t leave the tape in place as you will need to use a hairdryer, heatgun or lighter to shrivel the heatshrink and the tape might burn as you do so.
Step 5: Install cable pants
After applying the heatshrink in the previous step, you should have no difficulty sliding on the speaker pants. Use a ruler to calculate the length of the cable from one end to the end of the heatshrink. Its total measurement should be equal to the useable length of the connector plus the total length of the cable pants and then an extra inch or two.
Use an X-Acto knife or scissors to cut in a circular direction around the sheath of the cable. Before installing the cable pants, discard this piece that you cut off and remove any other fibers that might have been used during the manufacturing of the cable itself. If the each individual leg of the pants does not slide over the conductors easily, you may apply dish soap to the cable to help you.
Once you have the pants on the conductors, slide them down as far as you can, then move back up the cable roughly ¼-inch to allow some leeway when you install the connector. Don’t trim the cables; you don’t want to expose the copper.
Step 6: Installing the Connector
Finally, after you have installed the cable pants, heatshrink and sleeving, you are ready to install your connector. Pins, spades and banana plugs are all available and no matter what you choose, the step for installing them is identical.
Unscrew the set screws and slide the cable into the connector, marking the cable at its closest location to the connector. Use this mark as a measurement to remove the sheath from the conductor and slide the exposed wire into the connector. Tighten the set screws and ensure that they are in line over the wire and, depending on the connector you chose, screw the decorative cover back onto the cable pants.
Jesse lives in Houston, TX where he works at a home theater retail store, Home Theater Gear. He often writes articles on installation and setup tips for home audio speakers. For more information, visit the home audio section of his website.


