<p style="text-align: justify;">Photo retouching is the art of enhancing the images in such a way that these look absolutely flawless and perfect at all times. This art is not easy and you cannot expect to become a photo retouching expert in just a few days. You will need to be very patient to learn the photo retouching skills because it will take up lots of your precious time.</p>
<p style="text-align: justify;">However with the advent of the Movavi photo editor you have the ultimate opportunity to retouch your images in a fast and efficient manner. The editor created by Movavi is absolutely intuitive and interactive. You will not have to master any special computing skills in order to understand this photo editor.</p>
<p style="text-align: justify;">If you are wondering as to how to remove blemishes from the picture that you have clicked then it is really simple. Firstly you have to download and install the Movavi photo editor in your computer/laptop. After that you have to launch the editor and upload the image that you would like to fix.</p>
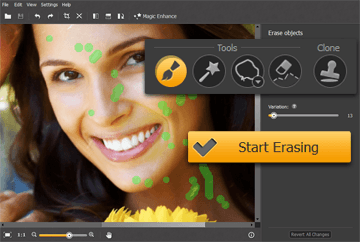
<p style="text-align: justify;">Tools such as Brush, Magic wand or Lasso are available in the picture editor so that you can use them to select the blemishes you want to remove. A green highlighting on the image will indicate the area from which the blemishes have to be removed. For safe side, there is an Erase Selection button that clears the excess areas that have been highlighted.</p>
<p style="text-align: justify;">In order to remove each and every imperfection from the image, you will have to highlight them and keep clicking on the option ‘Start Erasing’.</p>
<p style="text-align: justify;">Sometimes this method of blemish removal might not be enough. Thus, Movavi photo editor has a tool known as Clone which can copy a part of the image in order to remove the blemish present in another area of the image.</p>
<p style="text-align: justify;">Once you have been successful in getting rid off all the imperfections, you can save the original picture with those changes or create a new image file all over again.</p>
<p style="text-align: justify;">Photo blemishes that can generally be removed with the help of Movavi photo editor are: scratches, spots, wrinkles, pimples, skin imperfections, unwanted reflections, accidental light flashes and many others.</p>
<p style="text-align: justify;">Movavi photo editor has the capability of working as a blemish remover for both Windows and Mac users. Along with removing blemishes, the photo editor can perform all basic editing tasks.</p>
<p style="text-align: justify;">It can help in adjusting the contrast, brightness, highlight, exposure, noise etc. You can flip, rotate, crop and resize the images with the help of Movavi photo editor. Along with all this, you can save the image files in different formats such as BMP, TIFF, XBM, JPEG, XWD, Truevision Targa, PAM, Sun Rasterfile etc. Editing presets of the image editor are also extremely helpful.</p>

Photo Retouching Made Easier With The Help Of Movavi Photo Editor