<p>In our earlier article, we have learned Arc and Polyline commands from the Draw toolbar. In this article we will learn the Ellipse, Polygon command from the Draw toolbar.<br />
<strong>Using Ellipse Command:</strong><br />
Ellipse command can be selected in many ways. First is by clicking on the icon, second by writing ‘EL’ on the command line and thirdly by using the Draw drop down menu and selecting Ellipse sub menu.<br />
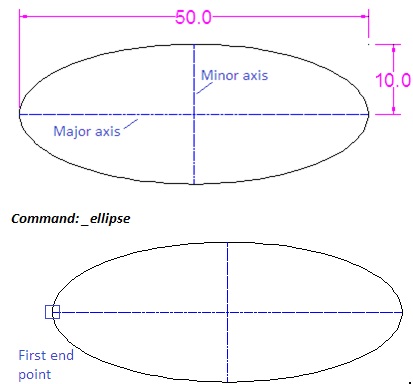
Note: As all of us know that in a circle we have a center point and corresponding radius or diameter. Here in Ellipse there are two axes , first is called Major axis and the second is called Minor axis.<br />
<img style="vertical-align: middle;margin-left: auto;margin-right: auto" src="http://myblogguest.com/forum/uploads/articles/2013/1/ellipsewith2axis.jpg" alt="" width="413" height="384" /><br />
Here we will first provide the first end point of the Major axis.<br />
<em>Specify axis endpoint &#8212;&#8212;&#8212;&#8212;&#8212;&#8212;&#8212;]:</em><br />
<em><img style="vertical-align: middle;margin-left: auto;margin-right: auto" src="http://myblogguest.com/forum/uploads/articles/2013/1/axis-end-point.jpg" alt="" width="466" height="185" /></em><br />
Here we will provide the second end point of the Major axis and give the distance or locate the end point of the Minor or other axis.<br />
<em>Specify other end&#8212;&#8212;&#8212;- axis:</em><br />
<em>Specify distance &#8212;&#8212;&#8212;&#8212;&#8211; [Rotation]:</em><br />
<em> </em><br />
<strong>Using Polygon Command:</strong><br />
Polygon command can be selected in many ways. First is by clicking on the icon, second by writing ‘POL’ on the command line and thirdly by using the Draw drop down menu and selecting Polygon sub menu.<br />
Note: Polygon is an equilateral closed Polyline, having different sides. A polygon can be either inscribed or circumscribed.<br />
<strong>I will show the different between inscribed and circumscribed polygon in the following exercise</strong>.<br />
<strong>Inscribed Polygon</strong><br />
Select the Polygon command and provide the number of sides, in our case it is 5 sides.<br />
<em>Command: _polygon </em><br />
<em>Enter number of sides : 5</em><br />
<em> </em><br />
No provide the center point of the polygon.<br />
<em>Specify center of polygon or [Edge]:</em><br />
<em> </em><br />
Here provide type of Polygon, provide Polygon option as inscribed by writing ‘I’ on command line.<br />
<em>Enter an option [Inscribed &#8212;&#8212;&#8212;&#8211;/&#8212;&#8212;&#8212;&#8212;&#8212;&#8212;-] <em>: i</em></em><br />
<em> </em><br />
And finally give the radius of the circle to create the Polygon.<br />
<em>Specify radius of circle: 10</em><br />
<em> </em><br />
The final result will be as shown in the image below.<br />
<img style="vertical-align: middle;margin-left: auto;margin-right: auto" src="http://myblogguest.com/forum/uploads/articles/2013/1/polygon.jpg" alt="" width="175" height="184" /></p>
<p style="text-align: center">Circumscribed Polygon</p>
<p>Select the Polygon command and provide the number of sides, in our case it is 6 sides.<br />
<em>Command: _polygon </em><br />
<em>Enter number of sides : 6</em><br />
<em> </em><br />
No provide the center point of the polygon.<br />
<em>Specify center of polygon or [Edge]:</em><br />
<em> </em><br />
Here provide type of Polygon, provide Polygon option as inscribed by writing ‘C’ on command line.<br />
<em>Enter an option [&#8212;&#8212;&#8212;&#8212;&#8212;/Circumscribed &#8212;&#8212;&#8212;-] <em>: c</em></em><br />
<em> </em><br />
And finally give the radius of the circle to create the Polygon.<br />
<em>Specify radius of circle: 10</em><br />
<em> </em><br />
The final result will be as shown in the image below.<br />
<img style="vertical-align: middle;margin-left: auto;margin-right: auto" src="http://myblogguest.com/forum/uploads/articles/2013/1/circumscribed_polygon.jpg" alt="" width="198" height="184" /><br />
Above two methods are based on center point Polygon, we can also specify the Edge option to draw the Polygon. For this we will select two edge points to create Polygon. Image shown below will be enough for us to understand this type of Polygon.<br />
Do it by yourself: Using Edge option, create a Polygon having 45? with the horizontal plane and having 7 sides.<br />
<img style="vertical-align: middle;margin-left: auto;margin-right: auto" src="http://myblogguest.com/forum/uploads/articles/2013/1/polygonside.jpg" alt="" width="165" height="141" /><br />
So far we have covered Arc, Polyline, Ellipse and Polygon command from the remaining portion of the Draw toolbar.<br />
<em> </em></p>
<h5>Featured images:</h5>
<ul>
<li> <span class="license">License: Image author owned</span></li>
<li> <span class="license">License: Image author owned</span></li>
<li> <span class="license">License: Image author owned</span></li>
<li> <span class="license">License: Image author owned</span></li>
<li> <span class="license">License: Image author owned</span></li>
</ul>
<p>Mary Stevens is married with 4 children . She is a training instructor of Autodesk Software, and her hobby is bicycle riding.<br />
This article is courtesy of Netwind Learning Center.</p>

Using Ellipse & Polygon Commands In AutoCAD 2013